Hand Drip Coffee Guide: Storing Beans, Water Temperature, and Brew Time for Beginners
A Beginner’s Guide to Hand-Drip Coffee at Home: Storing Beans, Water Temperature, and Brew Time
There’s something quietly satisfying about making your own cup of coffee before the day gets busy, and that’s exactly what this hand drip coffee guide is here to help with. Unlike a machine that does everything for you, hand-drip brewing — often called pour-over coffee — puts you in charge of every variable: the beans, the water, the timing, and the pour itself. That control can feel intimidating at first, but it’s also what makes the hobby so rewarding once you understand the basics. This guide walks through the essentials beginners actually need: how to keep beans fresh, what water temperature tends to work well, and how brew time can change the taste in your cup.
Why Hand-Drip Coffee Is Worth Learning
Hand-drip coffee doesn’t require expensive machinery, and the learning curve is gentler than it looks. With just a few simple tools, you can adjust strength, acidity, and body to match your personal taste, something a standard drip machine or capsule system usually can’t offer. Many beginners also find the process itself relaxing — measuring, pouring, watching the coffee bloom — almost like a short morning ritual rather than a chore. Once you get comfortable with a few core variables, you’ll likely notice that small changes make a real difference in flavor, which is part of what keeps people hooked on refining their technique over time.
What You Need to Get Started
Basic Equipment
You don’t need a full setup to start brewing hand-drip coffee at home. At minimum, it helps to have a dripper (cone-shaped drippers are common and beginner-friendly), paper filters sized for that dripper, a kettle for heating water, a container or server to catch the brewed coffee, and a way to measure your coffee and water — even a basic kitchen scale works fine. A burr grinder is also worth considering if you plan to buy whole beans, since freshly ground coffee tends to taste better than pre-ground.
Optional Upgrades
Once you’re comfortable with the basics, a few extras can make brewing more consistent. A gooseneck kettle allows for a slower, more controlled pour, which can help with more even extraction. A simple thermometer takes some of the guesswork out of water temperature. None of these are required to enjoy a good cup, but they can be useful upgrades as your interest grows. (How to Keep Your Home Organized Long-Term: Habits That Actually Stick)
How to Store Coffee Beans for Maximum Freshness
Keep Beans Away from Air, Light, and Moisture
Coffee beans begin losing flavor compounds fairly quickly once they’re exposed to air, so an airtight container is one of the simplest upgrades you can make. It’s also a good idea to keep beans away from direct sunlight and heat sources like a stove or a sunny windowsill, since both light and warmth can speed up staleness. Moisture is another concern — a damp environment can affect flavor and, in extreme cases, lead to mold, so a cool, dry cabinet is generally a better home for your beans than the refrigerator, despite what many people assume. Moving beans in and out of the fridge can introduce condensation from temperature changes, which may do more harm than good for beans you’re using day to day.
Buy Only What You’ll Use Soon
Buying smaller quantities more often tends to work better than stocking up on a large bag that sits around for weeks. Since roasted beans naturally lose aroma and complexity over time, it can be helpful to think of coffee less like a pantry staple and more like fresh produce — something best enjoyed relatively soon after it’s roasted. If you do buy in bulk, consider splitting the beans into smaller airtight portions so you’re not repeatedly exposing the whole batch to air every time you scoop some out.
Getting the Water Temperature Right
Why Temperature Matters
Water temperature is one of several factors that shape how flavors are extracted from the grounds, alongside grind size, brew time, and the coffee-to-water ratio. Water that’s too hot can pull out bitter, overly sharp notes, while water that’s too cool may result in a flat, underwhelming cup that tastes sour or weak. Generally speaking, water just off the boil — allowed to sit for a short moment after boiling — tends to land in a range that works well for most hand-drip methods. Lighter roasts often benefit from slightly hotter water to help bring out their more delicate flavors, while darker roasts may taste better with water that has cooled a bit more, since they can turn bitter more easily at higher temperatures.
A Simple Way to Check Temperature Without a Thermometer
If you don’t own a thermometer, you’re not out of luck. A common trick is to boil your water, then let the kettle sit off the heat for a short pause before pouring — this gives the water enough time to drop out of a rolling boil into a gentler range that’s friendlier to coffee grounds. Over time, you’ll likely develop a feel for the right waiting period based on your kettle and your taste preferences, even without measuring exactly.
Grind Size and Coffee-to-Water Ratio
Matching Grind Size to Your Brew Method
Grind size plays a bigger role in hand-drip coffee than many beginners expect. For most pour-over methods, a medium grind — similar in texture to coarse sand — is a reasonable starting point, though the ideal grind can vary depending on your dripper and how much coffee you’re using. Grinding too fine can lead to slow drainage and a bitter, over-extracted cup, while grinding too coarse may cause water to pass through too quickly, leaving the coffee weak and under-extracted. If your coffee tastes off, adjusting the grind size is often one of the first things worth troubleshooting.
Finding Your Ratio
The ratio of coffee to water is another variable worth experimenting with. Many beginners start with a ratio somewhere in the range of one part coffee to fifteen or sixteen parts water by weight as a baseline, then adjust up or down depending on whether they prefer a stronger or milder cup. Using a scale rather than eyeballing measurements can make it much easier to repeat a cup you liked — or fix one you didn’t.
Step-by-Step Brew Time Guide
The Bloom Stage
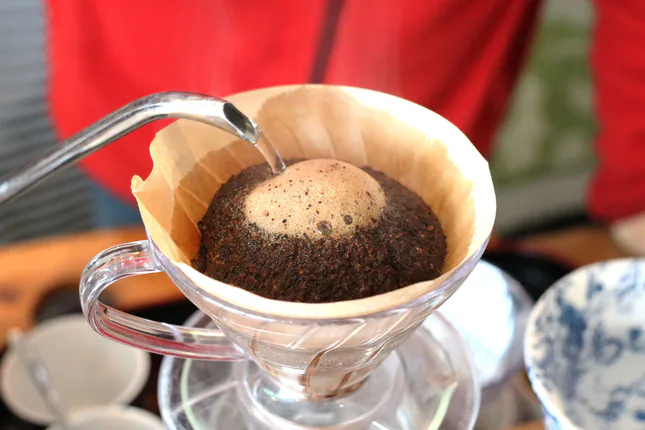
Before the main pour, it’s common practice to “bloom” the coffee — pouring just enough hot water to saturate the grounds and letting them sit for a short rest, often somewhere around thirty seconds as a starting point. This step is meant to let trapped gases in freshly roasted coffee escape, which can support more even extraction during the rest of the brew. Skipping the bloom isn’t a disaster, but many people find it produces a smoother, more balanced cup.
The Main Pour
After blooming, the main pour usually happens in a few slow, controlled additions rather than one continuous stream. Pouring in gentle circles, working from the center outward, helps keep the grounds evenly saturated and encourages more consistent extraction. Watching the water level and letting it draw down partway before adding more can prevent the dripper from overflowing and give you more control over pacing.
Total Brew Time
Total brew time for a typical hand-drip cup often falls somewhere in the range of two and a half to four minutes as a general guide, though this can vary quite a bit depending on your grind size, dripper shape, and how much coffee you’re making. If your brew finishes much faster than that, a coarser grind or a too-quick pour is usually the reason. If it drags on much longer, a finer grind or a slower pour is a common cause, though a clogged filter or too much fine grind dust can also play a role. Timing your brews with a simple phone timer, even loosely, can help you notice patterns and repeat the cups you enjoyed most.
Common Mistakes Beginners Make
A few missteps tend to show up again and again for people new to hand-drip coffee. Using stale, poorly stored beans is one of the most common — no amount of technique can fully make up for coffee that’s already lost its freshness. Pouring water too aggressively, without pausing to let it drain, is another frequent issue that can lead to uneven extraction. Skipping measurements altogether and eyeballing everything makes it hard to figure out what went right or wrong, which slows down learning. Finally, using water that’s either too hot or poured all at once, without a bloom, is an easy fix that many beginners overlook simply because they don’t yet realize how much it can matter.
Building a Simple Hand-Drip Routine at Home
Once you’ve got the basics down, the easiest way to keep improving is to build a small routine you can repeat. Buying beans in amounts you’ll finish within a reasonable window, storing them properly in an airtight container, sticking to a consistent ratio and grind size, and timing your pours all add up over time. It’s worth keeping in mind that hand-drip coffee is forgiving — even an imperfect cup is still coffee, and small adjustments from one brew to the next are usually enough to steadily improve your results. Rather than chasing a perfect cup right away, treating each morning brew as a small experiment can make the process more enjoyable and, over time, lead to a cup that consistently suits your taste.

답글 남기기